
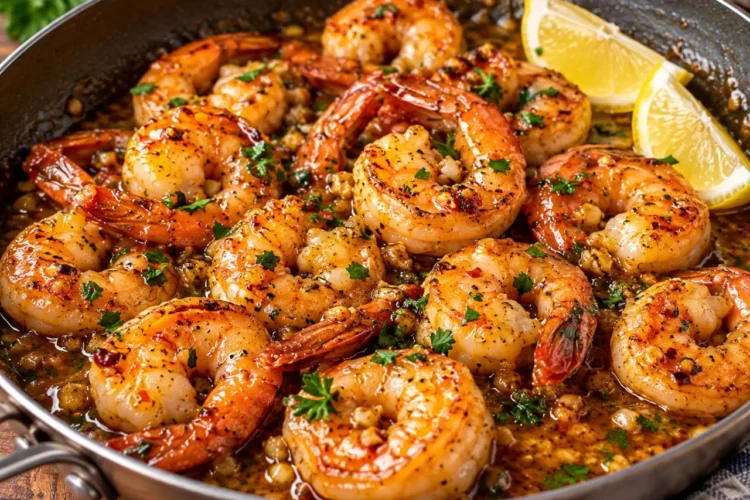
This Honey Garlic Butter Shrimp recipe is a quick and delicious dinner made with juicy shrimp coated in a glossy sauce of honey, garlic, butter, and fresh lemon juice. It combines sweet, savory, and slightly tangy flavors in one skillet, making it perfect for busy weeknights.
Ready in about 15 minutes, this easy shrimp recipe uses simple ingredients and requires very little preparation. Serve it over fluffy rice, toss it with pasta, or pair it with roasted vegetables for a flavorful meal that feels special without the extra work.
Why You’ll Love This Honey Garlic Butter Shrimp
- Quick and easy: Dinner is ready in approximately 15 minutes.
- One-pan recipe: The shrimp and sauce come together in a single skillet.
- Sweet and savory flavor: Honey balances the garlic, butter, and fresh lemon juice.
- Juicy shrimp: A short cooking time helps keep the shrimp tender.
- Versatile serving options: Enjoy it with rice, pasta, vegetables, or a fresh salad.
Ingredients You’ll Need
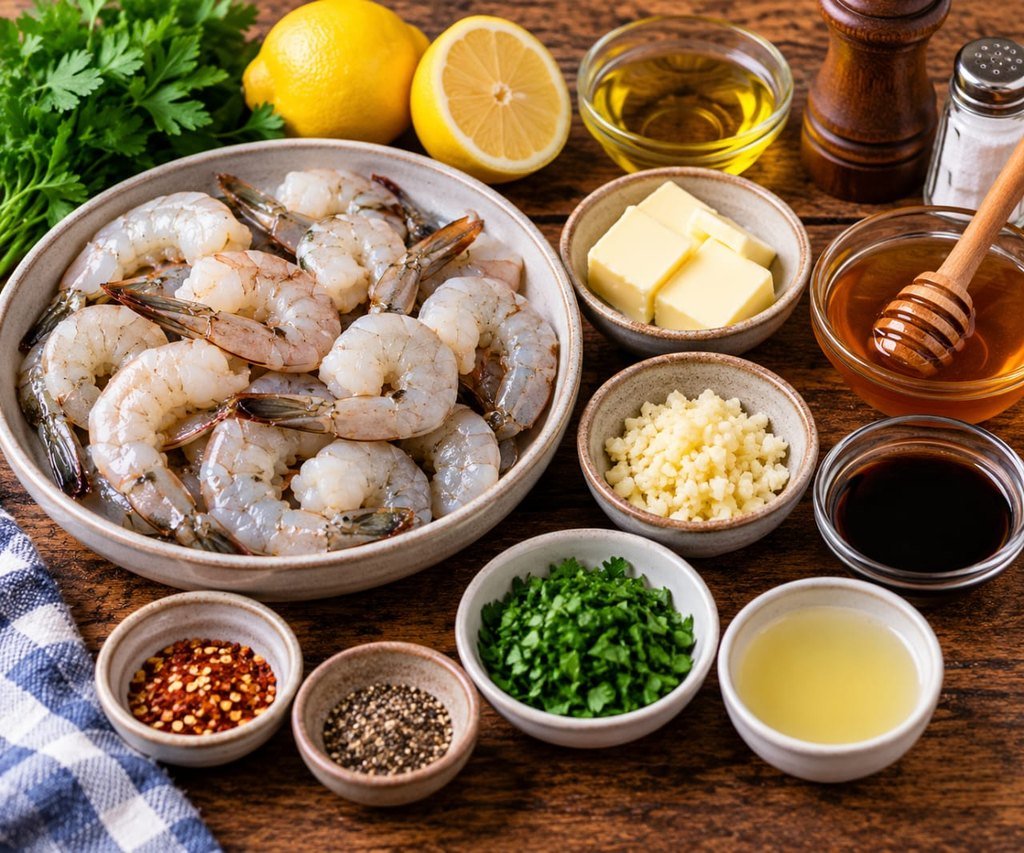
You only need a handful of everyday ingredients to make this flavorful shrimp dinner.
- 1 pound large raw shrimp: Peeled and deveined, with tails on or off.
- 3 tablespoons unsalted butter: Creates a rich, silky sauce.
- 1 tablespoon olive oil: Helps cook the shrimp without burning the butter too quickly.
- 4 garlic cloves: Finely minced for the best flavor.
- 3 tablespoons honey: Adds sweetness and helps create a glossy glaze.
- 1 tablespoon fresh lemon juice: Brightens the sauce and balances its richness.
- 1 tablespoon low-sodium soy sauce: Adds savory depth; use gluten-free tamari if needed.
- 1/4 teaspoon red pepper flakes: Optional, for a gentle spicy kick.
- Salt and black pepper: To taste.
- 1 tablespoon chopped fresh parsley: For garnish.
- Lemon wedges: Optional, for serving.
How to Make Honey Garlic Butter Shrimp
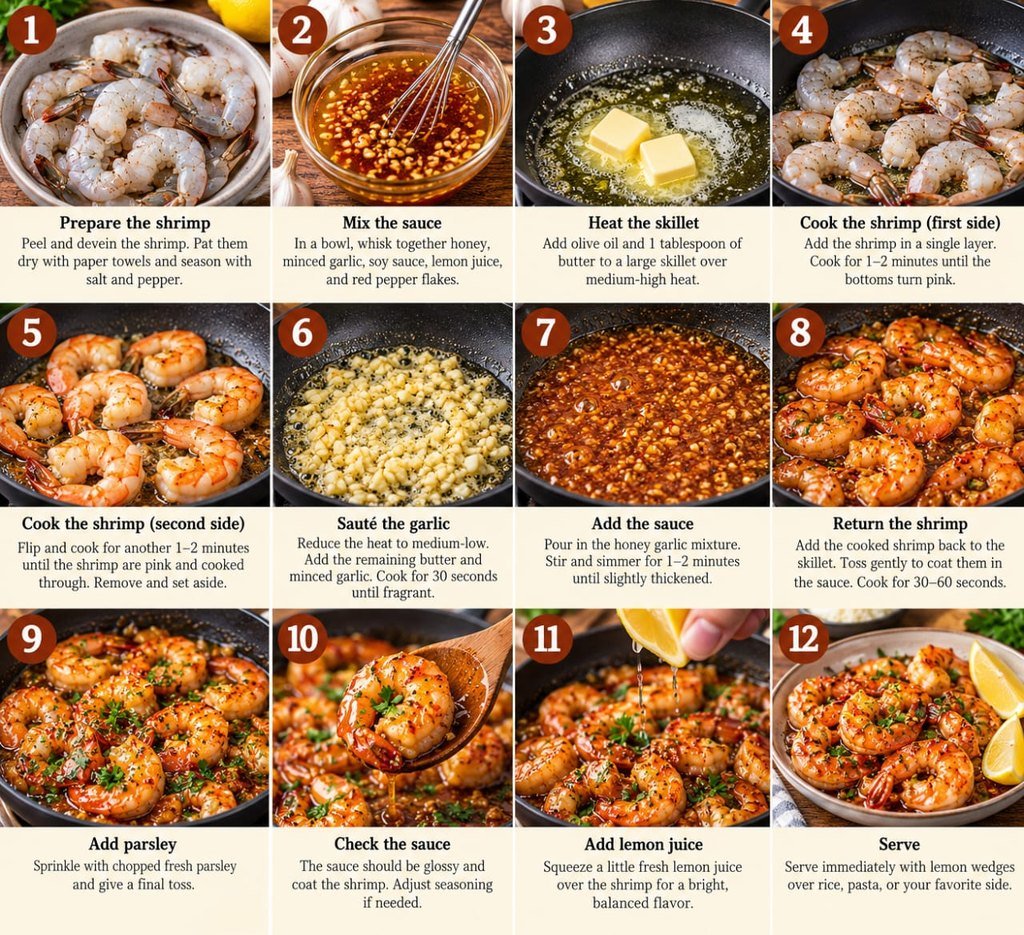
Step 1: Prepare the shrimp
If using frozen shrimp, thaw them completely. Remove the shells if necessary, devein the shrimp, and pat them thoroughly dry with paper towels. Season lightly with salt and black pepper. Dry shrimp brown better and are less likely to release excess water into the skillet.
Step 2: Mix the honey garlic sauce
In a small bowl, whisk together the honey, minced garlic, soy sauce, lemon juice, and red pepper flakes if using. Set the mixture aside while you cook the shrimp.
Step 3: Heat the skillet
Place a large skillet over medium-high heat. Add the olive oil and 1 tablespoon of butter. Once the butter has melted and the skillet is hot, arrange the shrimp in a single layer. Cook in batches if needed to avoid overcrowding.
Step 4: Cook the shrimp
Cook the shrimp for about 1–2 minutes on the first side, then turn and cook for another 1–2 minutes, depending on their size. They should turn pink and opaque and form a loose C shape. Transfer them to a plate as soon as they are cooked.
Step 5: Make the garlic butter glaze
Reduce the heat to medium-low. Add the remaining 2 tablespoons of butter to the skillet. Pour in the honey garlic mixture and stir continuously for about 1–2 minutes, until fragrant and slightly thickened. Avoid letting the garlic burn or the honey scorch.
Step 6: Toss the shrimp in the sauce
Return the cooked shrimp and any accumulated juices to the skillet. Toss gently for about 30–60 seconds until every shrimp is coated in the glossy sauce. Remove the pan from the heat as soon as the shrimp are hot and coated.
Step 7: Garnish and serve
Sprinkle with chopped parsley and serve immediately with lemon wedges. Spoon any remaining honey garlic butter sauce over the shrimp and your favorite side dish.
Tips for Perfect Honey Garlic Butter Shrimp
- Pat the shrimp dry: Excess moisture can prevent browning and dilute the sauce.
- Don’t overcrowd the pan: Cook in batches if necessary so the shrimp sear instead of steam.
- Watch the cooking time: Shrimp cook quickly and can become rubbery if left in the pan too long.
- Lower the heat before adding honey: Honey can burn quickly over high heat.
- Use fresh garlic: Freshly minced garlic provides a stronger, more aromatic flavor.
- Adjust the balance: Add a little extra lemon juice for brightness or a small drizzle of honey for more sweetness.
- Thicken the sauce naturally: Let it simmer briefly over low heat. It will also cling better once tossed with the shrimp.
What to Serve with Honey Garlic Butter Shrimp
This shrimp recipe pairs well with a variety of simple sides:
- Steamed white or brown rice: Absorbs the delicious honey garlic sauce.
- Garlic butter pasta: Makes the meal extra comforting.
- Roasted broccoli: Adds color and a fresh vegetable side.
- Steamed green beans: Provide a crisp, light contrast.
- Mashed potatoes: Create a satisfying dinner with the buttery sauce.
- Fresh green salad: Balances the sweetness and richness.
Easy Variations
Spicy Honey Garlic Shrimp
Add extra red pepper flakes or a small amount of hot sauce to give the glaze more heat.
Honey Garlic Shrimp with Vegetables
Cook broccoli, bell peppers, or snap peas in the skillet first, then set them aside. Prepare the shrimp and sauce as directed, and return the vegetables to the pan at the end.
Lemon Honey Garlic Shrimp
Add a little extra fresh lemon juice just before serving for a brighter, more citrus-forward flavor.
Gluten-Free Honey Garlic Shrimp
Use certified gluten-free tamari instead of regular soy sauce, and check the labels of all packaged ingredients.
Can You Use Frozen Shrimp?
Yes. Frozen shrimp work well in this recipe when thawed properly. Thaw them in the refrigerator overnight or place them in a sealed bag under cold running water. Drain and pat them completely dry before cooking. Avoid adding frozen shrimp directly to the skillet because excess water can dilute the sauce and prevent browning.
How to Store and Reheat Leftovers
Refrigeration
Place leftover shrimp in an airtight container and refrigerate within 2 hours of cooking. For the best quality, eat them within 2 days.
Reheating
Warm the shrimp gently in a skillet over low heat with a small splash of water or broth. Stir just until heated through. Avoid prolonged heating, which can make the shrimp tough.
Can You Freeze Honey Garlic Butter Shrimp?
Freezing cooked shrimp is possible, but the texture may become less tender after thawing and reheating. For the best results, prepare the sauce ahead of time and cook the shrimp fresh when you are ready to serve.
Frequently Asked Questions
How long does honey garlic butter shrimp take to cook?
The shrimp usually need about 3–4 minutes of total cooking time, depending on their size. The entire recipe takes approximately 15 minutes, including preparation.
How do I know when shrimp are cooked?
Cooked shrimp turn pink and opaque and curl into a loose C shape. For a food-safety check, the thickest part should reach 145°F (63°C).
Why is my honey garlic sauce too thin?
Shrimp can release water while cooking, especially if they are wet or overcrowded. Remove the shrimp and simmer the sauce briefly over medium-low heat until it reduces slightly, then return the shrimp to coat them.
Can I make this recipe without butter?
Yes. You can use olive oil instead, although the sauce will have a lighter flavor and a less buttery texture.
Can I prepare the sauce ahead of time?
Yes. Mix the honey, garlic, soy sauce, lemon juice, and red pepper flakes ahead of time and refrigerate in a covered container. For the freshest flavor, cook the shrimp just before serving.
What size shrimp works best?
Large or extra-large shrimp are ideal because they are easier to sear without overcooking. If using smaller shrimp, reduce the cooking time and watch them closely.
Final Thoughts
This Honey Garlic Butter Shrimp recipe proves that a delicious homemade dinner doesn’t need to be complicated. Tender shrimp, fresh garlic, honey, butter, and lemon come together in a glossy, flavorful sauce in just minutes. Serve it over rice or pasta, add your favorite vegetables, and enjoy a quick meal that is easy enough for any night of the week.