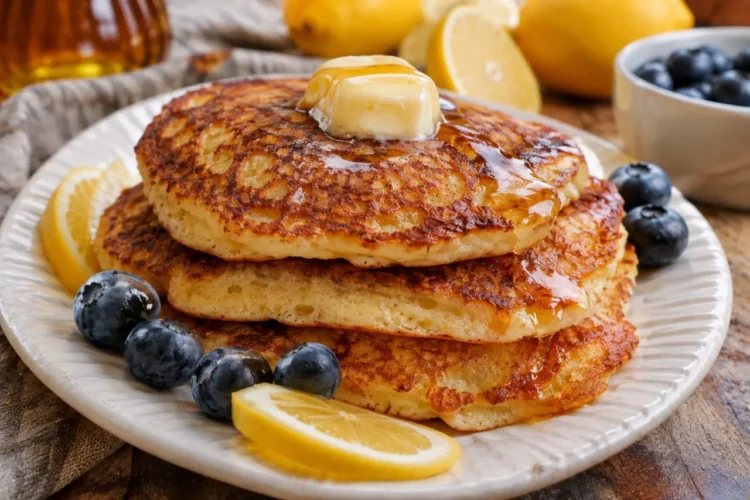
If you love pancakes with golden, buttery edges and soft, fluffy centers, these Crispy-Edged Pancakes are about to become your new breakfast favorite. The secret is simple: a well-balanced buttermilk batter, a properly heated skillet, and enough butter or oil to gently fry the edges until beautifully crisp.
Unlike ordinary pancakes that are soft all the way to the edge, these have a delicate crunch around the outside while staying tender in the middle. Serve them hot with maple syrup, fresh berries, or a little salted butter for a breakfast that feels special without requiring complicated ingredients.
Why You’ll Love These Crispy-Edged Pancakes
- Crispy golden edges: Butter and oil help create deliciously browned edges.
- Soft and fluffy centers: Buttermilk and the right mixing technique keep the pancakes tender.
- Simple ingredients: Everything is easy to find at a regular grocery store.
- Easy to customize: Add blueberries, chocolate chips, or cinnamon.
- Perfect for breakfast or brunch: Serve them with your favorite sweet or savory toppings.
Ingredients You’ll Need

For the Buttermilk Pancake Batter
- 1 1/2 cups (190g) all-purpose flour
- 2 tablespoons granulated sugar
- 2 teaspoons baking powder
- 1/2 teaspoon baking soda
- 1/2 teaspoon salt
- 1 1/4 cups (300ml) buttermilk
- 2 large eggs, at room temperature
- 3 tablespoons (42g) unsalted butter, melted and slightly cooled
- 1 teaspoon vanilla extract
For Cooking
- 2 tablespoons neutral vegetable oil, as needed
- 2–3 tablespoons unsalted butter, as needed
For Serving
- Maple syrup
- Salted butter
- Fresh blueberries or strawberries
- Whipped cream, optional
Ingredient Notes and Substitutions
Buttermilk
Buttermilk gives these pancakes a pleasant tang and reacts with the baking soda to help create a light texture. If you don’t have buttermilk, mix 1 tablespoon of lemon juice or white vinegar with enough milk to make 1 1/4 cups. Let it stand for 5–10 minutes before using. The result is a useful substitute, although real buttermilk gives the best flavor.
All-Purpose Flour
Regular all-purpose flour provides structure while keeping the pancakes tender. Measure it by spooning it into your measuring cup and leveling the top rather than packing it down.
Baking Powder and Baking Soda
These leavening ingredients help the pancakes rise. Baking soda also reacts with the acidity of the buttermilk. Check that your leavening ingredients are fresh for the best results.
Butter and Oil
Butter adds rich flavor and helps the edges brown. A little neutral oil raises the heat tolerance of the cooking fat and helps prevent the butter from burning too quickly. Using both gives you a good balance of flavor and crispness.
How to Make Crispy-Edged Pancakes
1. Mix the Dry Ingredients
In a large mixing bowl, whisk together the flour, sugar, baking powder, baking soda, and salt. Make sure the leavening ingredients are evenly distributed.
2. Combine the Wet Ingredients
In a separate bowl, whisk the buttermilk, eggs, melted butter, and vanilla extract until combined. Make sure the melted butter is not too hot before adding it to the eggs.
3. Make the Pancake Batter
Pour the wet ingredients into the dry ingredients. Gently fold with a spatula or whisk just until the flour is moistened. A few small lumps are perfectly fine. Avoid overmixing because this can make the pancakes tough.
4. Let the Batter Rest
Allow the batter to rest for about 5–10 minutes while you heat the skillet. This gives the flour time to hydrate and helps the batter settle. Avoid leaving the batter for hours because the leavening reaction becomes less effective over time.
5. Heat the Skillet
Place a heavy skillet, cast-iron pan, or griddle over medium heat. Allow it to heat evenly before cooking. Add a small amount of vegetable oil and butter. The fat should shimmer and sizzle gently without smoking.
6. Pour the Batter
Use approximately 1/4 cup of batter for each pancake. Pour it into the hot skillet, leaving enough space between pancakes. Avoid spreading the batter too thin because you want a fluffy center.
7. Cook Until the Edges Turn Golden
Let the pancake cook undisturbed for about 2–3 minutes. Watch for bubbles forming on the surface and edges that begin to look set and dry. The bottom should become golden brown and crisp.
8. Flip and Finish Cooking
Slide a thin spatula underneath and flip the pancake carefully. Cook the second side for approximately 1–2 minutes, or until golden and fully cooked in the center.
9. Repeat with the Remaining Batter
Add a little more oil and butter between batches as needed. If butter begins to darken or develop burnt specks, carefully wipe the pan before adding fresh fat.
10. Serve Immediately
Transfer the pancakes to a serving plate and top with salted butter and maple syrup. For the best crispy texture, serve them as soon as possible after cooking.

The Secret to Extra-Crispy Pancake Edges
Use a Heavy Skillet
Cast iron is an excellent choice because it retains heat well and helps pancakes brown evenly. A heavy stainless-steel skillet or a good-quality griddle can also work.
Use Enough Cooking Fat
A thin layer of butter and oil around the pancake helps fry the outer edge instead of simply steaming it. Add a little more fat between batches if the pan becomes dry.
Don’t Flip Too Early
Wait until bubbles appear and the edges look set. Flipping too early can prevent the first side from developing its golden crust.
Control the Heat
Medium heat is a good starting point. If the pancakes become dark before the centers cook, lower the heat slightly. If they remain pale and soft, allow the skillet to heat more before adding the next batch.
Keep Pancakes on a Wire Rack
If you’re cooking several batches, place the finished pancakes in a single layer on a wire rack set over a baking sheet. Keep them in a 200°F (95°C) oven. Avoid stacking them because trapped steam softens the crispy edges.
Try the Clarified Butter Technique
For an extra-rich, restaurant-inspired result, try cooking your pancakes in clarified butter or ghee. Unlike regular butter, clarified butter has most of its water and milk solids removed, so it can tolerate higher cooking temperatures without burning as quickly.
Heat a cast-iron skillet over medium to medium-high heat. Add enough clarified butter to coat the bottom generously. When it shimmers, add the pancake batter and cook until the edges are deeply golden and crisp. Flip and finish cooking the other side.
This method creates a more pronounced fried edge and a rich buttery flavor. It uses more fat than the everyday method, so start with a small batch and adjust the heat carefully.
Can You Make Pancakes with a Crispy Lace Edge?
Yes. For a decorative variation, spoon a little extra batter in a thin ring around the outside of a regular pancake. The thin batter fries into a delicate, lacy edge while the thicker center remains fluffy.
Keep the extra batter thin and use moderate heat so the lace browns without burning. This is a fun presentation technique, but the classic round pancake is still the easiest option for everyday cooking.
Expert Tips for Perfect Pancakes
- Don’t overmix: Small lumps in the batter are better than a completely smooth, overworked mixture.
- Use room-temperature eggs: They combine more easily with the other ingredients.
- Let the skillet preheat: An evenly heated pan helps create consistent browning.
- Use a combination of butter and oil: This gives you buttery flavor with better control over browning.
- Cook in batches: Overcrowding the skillet makes flipping difficult and can lower the pan temperature.
- Serve immediately: Pancakes lose their crispness as they cool and release steam.
Easy Pancake Variations
Blueberry Crispy-Edged Pancakes
Scatter a few fresh blueberries over each pancake immediately after pouring the batter into the skillet. Flip when the edges are set and cook until done.
Chocolate Chip Pancakes
Fold 1/3 cup of chocolate chips gently into the finished batter. Cook as directed and serve with sliced bananas or maple syrup.
Cinnamon Buttermilk Pancakes
Add 1/2 teaspoon of ground cinnamon to the dry ingredients for a warm, comforting flavor.
Lemon Pancakes
Add 1 teaspoon of finely grated lemon zest to the wet ingredients. Serve with fresh berries and a little powdered sugar.
Cornmeal Pancakes
For a slightly more textured pancake, replace 1/4 cup of the all-purpose flour with fine cornmeal. The texture will be a little more rustic and crisp.
What to Serve with Crispy-Edged Pancakes
These pancakes pair beautifully with sweet and savory breakfast favorites:
- Pure maple syrup
- Salted butter
- Fresh strawberries and blueberries
- Banana slices
- Greek yogurt
- Whipped cream
- Scrambled eggs
- Crispy breakfast potatoes
How to Store Leftover Pancakes
- Refrigerator: Let the pancakes cool completely, then store them in an airtight container for up to 3 days.
- Freezer: Place parchment paper between cooled pancakes and freeze in a freezer-safe bag or container for up to 2 months for best quality.
How to Reheat Pancakes
For the best texture, reheat pancakes in a toaster or in a skillet over medium-low heat until warmed through. An air fryer can also help restore some crispness.
A microwave is convenient for reheating, but it tends to soften the edges. Use short intervals if you choose this method.
Common Pancake Mistakes to Avoid
- Overmixing the batter: This can create dense, chewy pancakes.
- Cooking on very high heat: The outside may burn before the center cooks.
- Using too little fat: The edges may brown without developing the desired crisp texture.
- Flipping too soon: Wait for bubbles and set edges before turning.
- Stacking pancakes immediately: Steam gets trapped and softens the edges.
- Using old baking powder: Weak leavening can result in flat pancakes.
Frequently Asked Questions
Why aren’t my pancakes getting crispy?
The pan may not be hot enough, or there may not be enough cooking fat around the edges. Preheat the skillet properly and use a combination of butter and oil. Make sure the fat is gently sizzling, not smoking.
Can I use a nonstick pan?
Yes. A nonstick skillet works well for this recipe. Use medium heat, a little butter and oil, and avoid overheating the pan. Cast iron is especially good at retaining heat, but it is not essential.
Can I make the pancake batter ahead of time?
For the best rise and texture, mix the batter shortly before cooking. You can measure the dry ingredients ahead and refrigerate them separately from the wet ingredients. Combine them just before making the pancakes.
How do I keep pancakes crispy after cooking?
Place them in a single layer on a wire rack over a baking sheet in a 200°F (95°C) oven. Avoid stacking them because steam can make the edges soft.
Can I use regular butter instead of clarified butter?
Yes. Regular butter works well for the everyday method when combined with a little neutral oil. For higher-heat cooking and a more pronounced fried edge, clarified butter or ghee is a useful option.
Can I make these pancakes without buttermilk?
Yes. Mix 1 tablespoon of lemon juice or white vinegar into enough milk to make 1 1/4 cups. Let it stand for 5–10 minutes before using. The flavor and texture may differ slightly from pancakes made with real buttermilk.
What is the best pan for crispy-edged pancakes?
A well-seasoned cast-iron skillet is an excellent choice because it holds heat well. A heavy stainless-steel skillet or griddle can also produce great results.
Can I freeze leftover pancakes?
Yes. Cool them completely, place parchment paper between each pancake, and store them in a freezer-safe container for up to 2 months for best quality.
Conclusion
Making crispy-edged pancakes at home is all about balancing the batter, heat, and cooking fat. With a simple buttermilk batter and a properly heated skillet, you can enjoy golden, buttery edges and a soft, fluffy center in every bite.
Serve them straight from the pan with maple syrup, fresh berries, or salted butter. Once you master the technique, these pancakes can turn an ordinary breakfast into something worth looking forward to.