
Is there anything more comforting than the rich, creamy, and unmistakable flavor of peanut butter? Now, imagine that flavor transformed into a luxurious, silky pie that requires zero oven time. This No-Bake Peanut Butter Pie is your ticket to dessert heaven. Perfect for sweltering summer days, hectic holidays, or anytime you need a guaranteed crowd-pleaser, this recipe is surprisingly simple. With a crunchy chocolate crust, a filling that’s impossibly light yet decadent, and a topping that adds the perfect finish, this pie comes together in under 30 minutes of active work. Let’s create a dessert that will have everyone begging for the recipe.

Why You’ll Love This No-Bake Wonder
Before we dive into the ingredients, let’s talk about why this recipe is a staple. First, it’s no-bake, meaning you avoid heating up the kitchen. Second, it’s make-ahead friendly, actually requiring chill time to set perfectly. Third, it’s highly customizable use your favorite type of peanut butter, cookie for the crust, or toppings. It’s a forgiving recipe ideal for beginners but impressive enough for seasoned bakers.
No-Bake Peanut Butter Pie: Your Shopping List
Gathering your ingredients is the first step to success. Here’s everything you’ll need, divided by component.
For the Chocolate Crust:
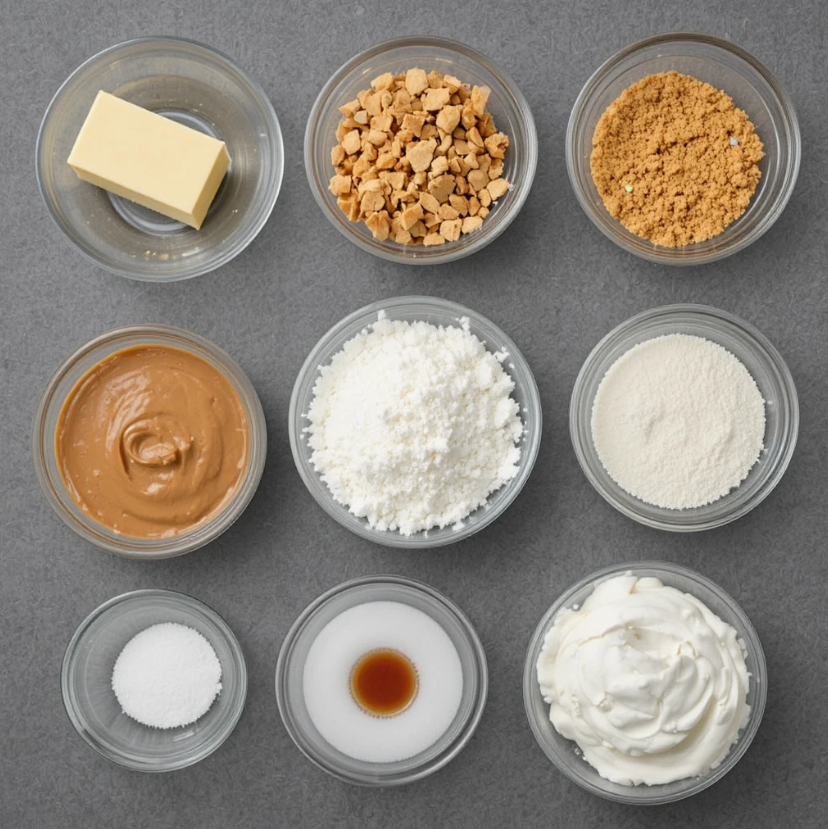
- 1 ½ cups (about 150g) chocolate cookie crumbs (from Oreo filling removed, or use ready-made chocolate wafer crumbs)
- 5 tablespoons (70g) unsalted butter, melted
- 2 tablespoons granulated sugar (optional, if using unsweetened crumbs)
For the Peanut Butter Filling:
- 1 cup (about 260g) creamy peanut butter (not natural/oily style for best results)
- 1 package (8 ounces or 226g) full-fat cream cheese, softened to room temperature
- 1 cup (120g) powdered sugar, sifted
- 1 teaspoon pure vanilla extract
- ¼ teaspoon fine sea salt
- 1 ½ cups (360ml) cold heavy cream or heavy whipping cream
For the Topping & Garnish:
- 1 cup (240ml) cold heavy cream or heavy whipping cream
- 2 tablespoons powdered sugar
- ¼ cup chocolate sauce or melted chocolate
- Optional: Chopped peanuts, peanut butter cups, or chocolate shavings for garnish.
Step-by-Step Instructions for Perfect Pie
Follow these numbered steps carefully for a flawless, sliceable pie every single time.
Step 1: Prepare the Chocolate Cookie Crust
- Crush the Cookies: If you’re not using pre-made crumbs, place cookies (filling removed if using Oreos) in a food processor or a sealed zip-top bag. Process or crush with a rolling pin until you have fine, even crumbs.
- Mix with Butter: In a medium bowl, combine the cookie crumbs and melted butter (and sugar, if using). Mix with a fork until all the crumbs are evenly moistened and resemble wet sand.
- Form the Crust: Pour the mixture into a standard 9-inch pie plate. Using the bottom of a measuring cup or a glass, press the crumbs firmly and evenly into the bottom and up the sides of the plate.
- Chill: Place the crust in the refrigerator to set while you make the filling.
Step 2: Make the Peanut Butter Filling
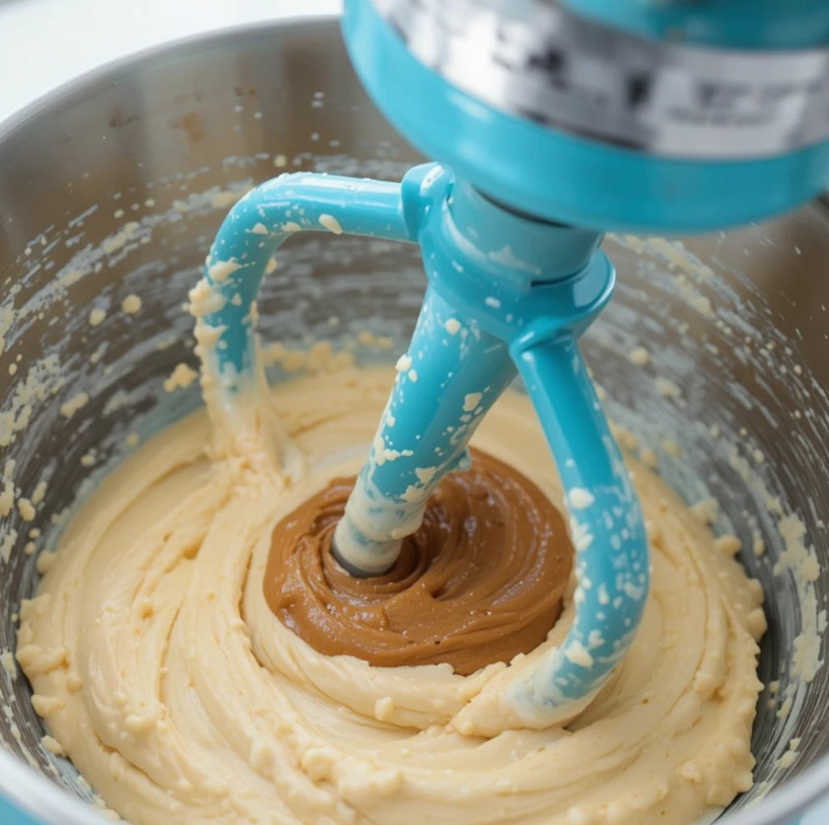
- Cream the Base: In a large mixing bowl, use an electric hand mixer or stand mixer fitted with the paddle attachment to beat the softened cream cheese and peanut butter together on medium speed until completely smooth and well combined, about 2 minutes.
- Add Sweeteners & Flavor: Add the sifted powdered sugar, vanilla extract, and salt. Beat on low speed initially to avoid a sugar cloud, then increase to medium until fully incorporated. Scrape down the sides of the bowl as needed.
Step 3: Whip and Fold
- Whip the Cream: In a separate, clean, chilled bowl, whip the 1 ½ cups of cold heavy cream on medium-high speed until stiff peaks form. Be careful not to over-whip into butter.
- Lighten the Filling: Add about 1 cup of the whipped cream to the peanut butter mixture. Gently fold it in with a spatula to lighten the dense mixture. This makes the next step easier.
- Incorporate Fully: Add the remaining whipped cream. Now, fold very gently but thoroughly until no white streaks remain and the filling is uniform in color. The key is to maintain as much air as possible for a light, mousse-like texture.
Step 4: Assemble and Chill
- Fill the Crust: Remove the chilled crust from the fridge. Spoon the peanut butter filling into the crust, spreading it evenly with an offset spatula or the back of a spoon.
- Smooth the Top: Gently tap the pie plate on the counter a few times to release any air bubbles and create an even surface.
- The Long Chill: Cover the pie loosely with plastic wrap, ensuring it doesn’t touch the surface. Refrigerate for at least 6 hours, but ideally overnight. This is non-negotiable for the pie to set properly and slice cleanly.
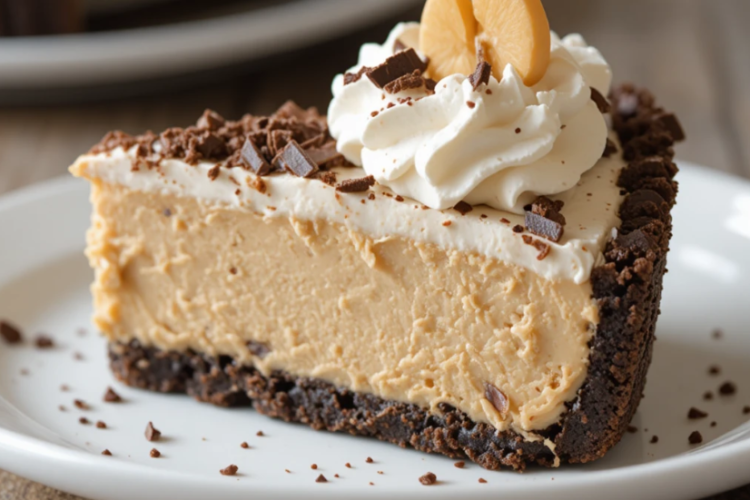
Step 5: Add Toppings and Serve
- Final Whip: Just before serving, whip the remaining 1 cup of heavy cream with 2 tablespoons of powdered sugar until medium-stiff peaks form.
- Decorate: You can pipe the whipped cream around the edges of the pie or spread it over the entire top. Drizzle generously with chocolate sauce or melted chocolate.
- Garnish: Sprinkle with chopped peanuts, peanut butter cup pieces, or chocolate shavings for extra texture and visual appeal.
- Slice and Serve: Use a sharp knife dipped in hot water and wiped dry to cut clean slices. Serve immediately.
Pro Chef Tips for a Flawless Pie
- Peanut Butter Choice: For a stable, sliceable filling, use commercial creamy peanut butter like Jif or Skippy. Natural peanut butters (with oil separation) can make the filling greasy and prevent it from setting firmly.
- Room Temperature is Key: Ensure your cream cheese is truly softened. Cold cream cheese will create lumps in your filling that are impossible to beat out.
- Cold Cream Whips Best: Chill your mixing bowl and beaters/whisk attachment in the freezer for 15 minutes before whipping the heavy cream. This helps it whip faster and achieve greater volume.
- Folding Technique: Use a large rubber spatula. Cut down through the center of the mixture, sweep across the bottom, and fold over the top. Rotate the bowl and repeat. This preserves the air bubbles.
- No-Drip Chocolate Drizzle: For picture-perfect drips down the side, let your melted chocolate or sauce cool slightly. Use a spoon or squeeze bottle and gently guide it over the edge.
- Storage: Keep the pie covered in the refrigerator for up to 4 days. The crust will soften slightly over time but will still be delicious. This pie does not freeze well, as the whipped cream filling can become grainy upon thawing.
Customize Your Creation: Fun Variations
This recipe is a fantastic canvas for your creativity!
- Crust Swap: Try a graham cracker crust, pretzel crust (for sweet-salty goodness!), or Oreo crust (keeping the filling for extra chocolate).
- Nutty Twist: Use chunky peanut butter for added texture, or swap in almond or cashew butter.
- Chocolate Lover’s Dream: Add a layer of chocolate ganache on the crust before adding the peanut butter filling.
- Mini Pies: Use a muffin tin with liners to create individual no-bake peanut butter pies. Perfect for parties!
Ready to Impress? Your Dessert Masterpiece Awaits
This No-Bake Peanut Butter Pie is more than just a recipe; it’s a surefire way to create moments of joy. It requires no special skills, just a little patience during the chilling time. The result is a professional-looking, incredibly delicious dessert that balances sweet, salty, creamy, and crunchy in every single bite.
So, what are you waiting for? Gather those simple ingredients, follow these easy steps, and prepare to receive the compliments. Don’t forget to share your creation and tag your photos! Once you try this no-bake magic, it’s sure to become a requested favorite for years to come.